WordPress有很多生成Sitemap的插件,以前都是用柳城的(Baidu Sitemap Generator ),本着强迫症的原则,在网上搜了下纯代码版的。下面记录下本站实现HTML网站地图的过程。
建议配合 WordPress免插件实现XML网站地图,效果更好。文章源自亦枫博客-https://yflad.cn/527.html
文章源自亦枫博客-https://yflad.cn/527.html
1、新建一个sitemap.php至主题目录下,复制下面代码粘贴:文章源自亦枫博客-https://yflad.cn/527.html
点击
展开收缩
文章源自亦枫博客-https://yflad.cn/527.html
- <?php
- /*
- Template Name: Sitemap
- */
- ?>
- <!DOCTYPE html PUBLIC "-//W3C//DTD XHTML 1.0 Transitional//EN" "http://www.w3.org/TR/xhtml1/DTD/xhtml1-transitional.dtd">
- <html xmlns="http://www.w3.org/1999/xhtml">
- <head profile="http://gmpg.org/xfn/11">
- <meta http-equiv="Content-Type" content="text/html; charset=<?php bloginfo( 'charset' ); ?>" />
- <title>站点地图 | <?php bloginfo('name'); ?></title>
- <meta name="keywords" content="站点地图,<?php bloginfo('name'); ?>" />
- <meta name="copyright" content="<?php bloginfo('name'); ?>" />
- <link rel="canonical" href="<?php echo get_permalink(); ?>" />
- <style type="text/css">
- body {font-family: Microsoft Yahei,Verdana;font-size:13px;margin:0 auto;color: #000000;background: #ffffff;width: 990px;margin: 0 auto}
- a:link,a:visited {color:#000;text-decoration:none;}
- a:hover {color:#08d;text-decoration:none;}
- h1,h2,h3,h4,h5,h6 {font-weight:normal;}
- img {border:0;}
- li {margin-top: 8px;}
- .page {padding: 4px; border-top: 1px #EEEEEE solid}
- .author {background-color:#EEEEFF; padding: 6px; border-top: 1px #ddddee solid}
- #nav, #content, #footer {padding: 8px; border: 1px solid #EEEEEE; clear: both; width: 95%; margin: auto; margin-top: 10px;}
- </style>
- </head>
- <body vlink="#333333" link="#333333">
- <h2 style="text-align: center; margin-top: 20px"><?php bloginfo('name'); ?>'s SiteMap </h2>
- <center></center>
- <div id="nav"><a href="<?php bloginfo('url'); ?>/"><strong><?php bloginfo('name'); ?></strong></a> » <a href="<?php echo get_permalink(); ?>">站点地图</a></div>
- <div id="content">
- <h3>最新文章</h3>
- <ul>
- <?php
- $previous_year = $year = 0;
- $previous_month = $month = 0;
- $ul_open = false;
- $myposts = get_posts('numberposts=-1&orderby=post_date&order=DESC');
- foreach($myposts as $post) :
- ?>
- <li><a href="<?php the_permalink(); ?>" title="<?php the_title(); ?>" target="_blank"><?php the_title(); ?></a></li>
- <?php endforeach; ?>
- </ul>
- </div>
- <div id="content">
- <li class="categories">分类目录<ul>
- <?php wp_list_categories('title_li='); ?>
- </ul></li>
- </div>
- <div id="content">
- <li class="categories">单页面</li>
- <?php wp_page_menu( $args ); ?>
- </div>
- <div id="footer">查看博客首页: <strong><a href="<?php bloginfo('url'); ?>/"><?php bloginfo('name'); ?></a></strong></div><br />
- <center>
- <div style="text-algin: center; font-size: 11px"><strong><a href="https://yflad.cn/sitemap.xml" target="_blank">站点地图</a></strong> Latest Update: <?php $last = $wpdb->get_results("SELECT MAX(post_modified) AS MAX_m FROM $wpdb->posts WHERE (post_type = 'post' OR post_type = 'page') AND (post_status = 'publish' OR post_status = 'private')");$last = date('Y-m-d G:i:s', strtotime($last[0]->MAX_m));echo $last; ?><br /><br /></div>
- </center>
- </body>
- </html>
文章源自亦枫博客-https://yflad.cn/527.html
文章源自亦枫博客-https://yflad.cn/527.html
文章源自亦枫博客-https://yflad.cn/527.html
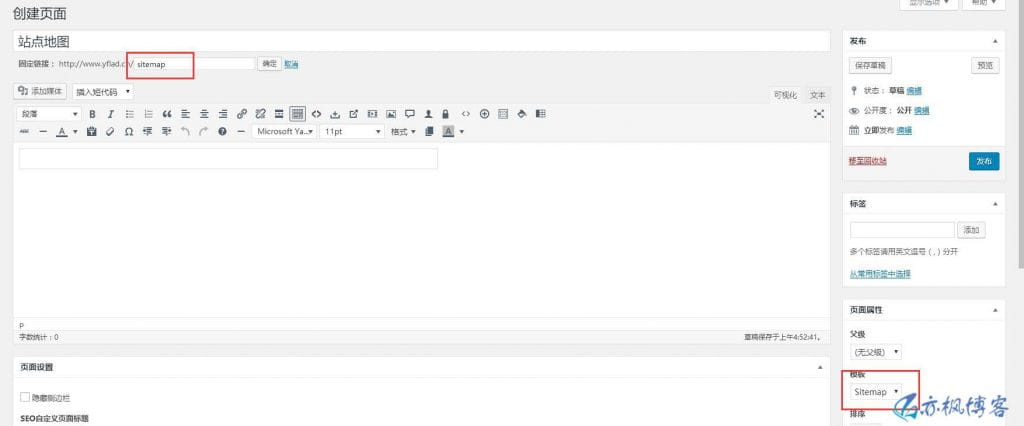
2、然后“新建页面”(如下图所示)。修改固定链接样式: 文章源自亦枫博客-https://yflad.cn/527.html
文章源自亦枫博客-https://yflad.cn/527.html
3、然后将页面的链接加入到自己的想要的地方,可以自己任何地方调用。比如footer.php里。(因为各主题不一,贴下自己的吧) 文章源自亦枫博客-https://yflad.cn/527.html
文章源自亦枫博客-https://yflad.cn/527.html
4、本站演示HTML版站点地图:yflad.cn/sitemap文章源自亦枫博客-https://yflad.cn/527.html 文章源自亦枫博客-https://yflad.cn/527.html
继续阅读
扫扫关注公众号

我的微信
扫扫体验小程序

我的公众号


